LunarBot Hardware Assembling and Debugging
This is not a step-by-step tutorial but will definately help you avoid stupid mistakes that you might led to fatal errors and bugs!!
To assemble the LunarBot from sketch, you need a chassis body, wheels, electro board with servos and other essential components on board, powering system, sensors that could be customized as you wish, and a computation module that could be a nuc running Ubuntu22.04 with enough I/O.
Wheels to Servos
To connect wheels to servos, we need to take 4 powering cables including U,V,W and PE, 2 powering cables for sensors to and (or GND), and a signal cable to servo.
Just plug all powering cables from motors to correspond servos following lables on the servo.
PAY ATTENTION to powering cables from origin and limitation sensors from wheels. All cable should be plugged in powering module on electro board, and all should be connected to SAME GND RELATIVE TO of each steering servo.
Signal cable for origin and limitation sensors could be pluged in multiple "signal-in" slots on driving servos, as long as you configure proper signal-in slot in kinco software for the servo driver.
Servo to Computation Module
All servo should be in series circuit connect by RJ45 cables from "in" to "out" one to another. Last servo in this series provide a RJ45 cable that used to communicate with computation module. Use a certified RJ45 extractor to get CAN_H and CAN_L lines, and then through a USB-CAN converter is an elegant way to let software aware of these cute wheels and servos.
!!!ATTENTION!!!
- Look up documents about servos which lines of RJ45 is CAN_H and CAN_L. This must match RJ$% extractor and later match the USB_CAN device.
- REMEMBER TO SETUP CAN PORTS IN COMPUTATION MODULE BY RUNNNING FOLLOWING COMMANDS
sudo ip link set can0 txqueuelen 1000
sudo ip link set can0 up type can bitrate 500000
Substitute "can0" with your actural device and correct bitrate.
Powering Module BUGS
When the auto-initialize process seems in-correct that wheel is not rotating smoothly, or servos keeps powering off automatically just after powered on, then IT"S TIME TO JUICE UP THE BATTERY. Don't believe the capacity indicator on the battery!
Robot Manipulator and Gripper
The manipulator should be connected to low-voltage power cell with at least 24V and 100 watts power by 2 wires aeroplane cable. A RJ45 cable should be connected to computation module for communication.
The gripper should be connected to link 7 (frange) of manipulator by a 5 wire aeroplane cable, this cable is both capable of providing power and transmitting signal.
See docs/Manipulator and Gripper.md for usage and important notes about manipulator and gripper.
Computation Module
Make sure all cables are connected correctly.
Internet Connection
The NUC should be connected to a external wifi card. DISABLE the internal wifi card to avoid any conflict by following steps.
- Determine current network manager of your system (NetworkManager or NetPlan)
cat /etc/netplan/*.yaml
If the yaml is not empty, then NetPlan is the current network manager. Otherwise, the content could be
# Current Network Manager is NetworkManager
Then make sure NetworkManager is in charge of all network interfaces by:
nmcli device status
And the output is like:
DEVICE   TYPE      STATE      CONNECTION
wlpaaaa  wifi      connected  Tsinghua-Secure
wlpbbbb  wifi      connected  Tsinghua-Secure 1
lo      loopback  unmanaged  --
- Determine the name of the internal wifi card. You can unplug the external wifi card and check the output of:
ifconfig
And let's assume the name of the internal wifi card is wlpaaaa, and it's connetion is Tsinghua-Secure.
- Disable the internal wifi card by if you're using NetworkManager:
sudo nmcli connection modify "interface" autoconnect no
sudo nmcli device down "interface"
!!!ATTENTION!!! that "interface" should be the CONNETION name rather than DEVICE name.
- Verify the connection is disabled by:
nmcli connection status
And the output should be like:
DEVICE   TYPE      STATE      CONNECTION
wlpaaaa  wifi      disconnected  --
wlpbbbb  wifi      connected  Tsinghua-Secure 1
lo      loopback  unmanaged  --
Ethernet Connection with Realman Robot Manipulator
As the manipulator is connected to the NUC via Ethernet, you need to configure the Ethernet connection manually to avoid conflict with the wifi connection.
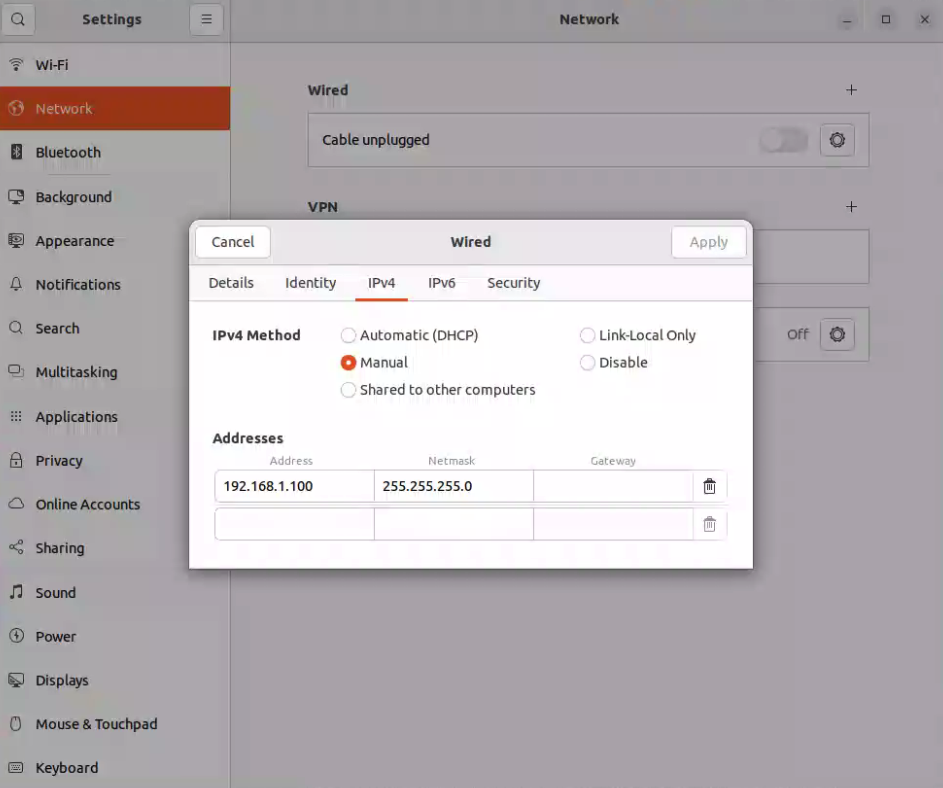
- Configure the ip address by Ubuntu Setteings->Network->Wired->IPV4 Settings->Manual. and set the ip address to
192.168.1.100, subnet mask to255.255.255.0, and gateway to192.168.1.1.
- Configure Static IP for the Ethernet Interface and make sure ethernet is NOT the default connection.
nmcli connection modify "Wired-Connection-1" ipv4.addresses 192.168.1.100/24 ipv4.method manual
nmcli connection modify "Wired-Connection-1" ipv4.gateway ""
- Configure WiFi for General Network Traffic.
nmcli connection modify "WiFi-Connection-1" ipv4.method auto
- Configure the Ethernet connection to manipulator and turn on the connection.
nmcli connection modify "ethernet interface name" +ipv4.routes "192.168.1.0/24 192.168.1.1"
nmcli connection up "ethernet interface name"